Ben Sullivan's Auto Page

Ben Sullivan's Auto Page


2003 VW Jetta Wagon GLS 1.8T
"Golf Estate Variant" Tail Lights install.

10/13/03 - I ordered these European tail lights from Blitzen155 (off of the VW Vortex Jetta/Golf IV forum - Fantastic transaction! I highly recommend) for $229.75 shipped. The install was very straightforward and easy thanks to some instructions given to me by ShockWaveVT, another VW Vortex user. My friend Felix helped me w/ the install - a second set of hands is VERY helpful in this. Here are some links to VW Vortex discussions about the rear tail lights:

http://forums.vwvortex.com/zerothread?id=898014
http://forums.vwvortex.com/zerothread?id=761367
http://forums.vwvortex.com/zerothread?id=584351

Here are the instructions that ShockWaveVT sent to me, slightly edited:

Overall installing the taillights is pretty simple, the only tricky bit is using a paperclip to get the wire out of the connector to swap positions. Especially since the only descriptions I've seen are a bit vague... *see links above

Based on those descriptions, it took me about 3 hours to figure out how to use the paperclip properly.
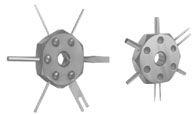
lisle 56500
I felt like such a fool when I finally figured it out and realized how simple it was. If you want to do it the really easy way, there is a tool available to remove the wires from the connector. It is made by Lisle, part number 56500. It is green, and has the pins/prongs needed., but they are like $15 and most parts stores have to order it for you, so if you can get the paperclip to work, it will save you time & $$.

    Here's the procedure I followed:
  1. Pull off the access panels on each side of the cargo area.
  2. Unplug the wiring harness connector by squeezing the sides
  3. Remove the 3 bolts holding each taillight, being careful not to drop the bolts into the bumper (driver's side is more difficult due to the CD changer mount)

    Now for the "fun" wiring part.. I swear when I finally figured this out i about smacked myself because it was so simple...
  4. Open the plastic connector on the wiring harness by using a tiny flat-head screwdriver to pop open the little tabs along the back edge of the connector. Do this carefully so you don't break off any of the plastic tabs
  5. Bend a paper clip into a narrow U shape with the ends even, a medium paperclip works the best
  6. insert the prongs of the paper clip into the front (plug) end of the appropriate wire (Passenger side = GREEN & BLACK wire, Driver side = WHITE & BLACK)

    If I recall correctly, you line the paper clip up so its perpendicular to the slot in the wire plug. Just push the prongs in and hold them there while you pull the wire out the back of the connector. If the wire doesnt come out easily try jiggling the paperclip a bit. There are two tiny tabs in the metal plug that need to be pressed down for the wire to come out of the plastic connector.

  7. Once the wire is out, simply plug it into the slot that was empty before, and close up the plastic connector. The slot that was vacated is for your rear fog (driver's side only) or extra brake lights (see the DIY & FAQ post on the MK IV forum for details)
  8. Attach your new euro-spec taillights, check the bulbs, plug in the wiring harnesses and you're done!

If you get the paperclip bit down quickly (or if you buy the wire extraction tool) this mod takes 30 minutes tops

If you want to wire the rear fog, I would recommend getting a kit from ECStuning.com or evolutionsports.com, both provide everything you need.

click for full size image The box with the two tails inside. 102K click for full size image
click for full size image Drivers side tail light. 91K click for full size image
click for full size image Before. Note: the big difference between the new tail lights and the old ones are that they have a visible amber turn signal section instead of a red/amber turn signal section. 107K click for full size image
click for full size image Here is the inside of the compartment on the Drivers side. The bolts are pointed out, some are not visible. I attempted to remove the styrofoam CD Changer holder, but could not easily reach the top screw so I left it in. It does not need to be removed to do the tail light swap. 93K click for full size image
click for full size image Before. 131K click for full size image
click for full size image Passenger side comparison. 157K click for full size image
click for full size image Driver side comparison. 133K click for full size image
click for full size image Removing one of the bolts to the CD Changer tray before I realized I wouldn't need to remove it. Note: I marked up this photo to show where the wires in the harness will be switched. 77K click for full size image
click for full size image The old light being removed. 106K click for full size image
click for full size image The new light being installed. Really, be VERY careful when undoing the nuts. They can drop very easily into the bumper and be lost forever! 135K click for full size image
click for full size image I tried to get some shots of the back of the light, but the distance inside the compartment is too small to get any great shots. Here is one showing where the bolts are and where the nuts will screw on. 117K click for full size image
click for full size image Another inside shot. This one revealed the tabs which you will squeeze to remove the plate which holds all the bulbs. We ended up having one bulb that needed to be reinserted to get a good connection, i.e. it did not light up the first time we turned on the lights. 135K click for full size image
click for full size image Another shot inside the cavity. 88K click for full size image
click for full size image Here is the Driver side with the light removed. You can very easily see the three holes which the mounting bolts for the lights pass through. 110K click for full size image
click for full size image Here is the Driver side wire harness with the little "door" open. You can see the spot where you will move the wire from #1 to #5. I APOLOGIZE for all the dog hair in the photo(s)! One of the functions of my Wagon is to cart my Yellow Lab around a lot. 113K click for full size image
click for full size image Use a small screwdriver to open the little "latches" on the "door". This is the Passenger side. 85K click for full size image
click for full size image Opening the final "latch". 89K click for full size image
click for full size image Here is how to use a paper clip to release the wire. This paper clip seemed to be too big - it did not work for us. A smaller one did, easily. The ends of the "U" shaped paper clip must be about even. 102K click for full size image
click for full size image Again, the paper clip is used to release the wire. Here you can see the GREEN/BLACK wire going from slot #6 to #5. 99K click for full size image
click for full size image Reinstall the harness into the lights and voila! New tails. 148K click for full size image
click for full size image Another "after" shot. 143K click for full size image
click for full size image Some "next day" shots. Sorry, these aren't great, but they give you some idea of the difference. 78K click for full size image
click for full size image Rear, darker. 38K click for full size image
click for full size image Closeup on Driver side. 53K click for full size image
click for full size image Driver side. 123K click for full size image
click for full size image Driver side again. 88K click for full size image

Back to the 2003 VW Jetta Wagon GLS 1.8T page

contact me - cpl_clegg *~at~* yahoo.com